Installing the Bareos Server
If you are like me, you want to get Bareos running immediately to get a feel for it, then later you want to go back and read about all the details. This chapter attempts to accomplish just that: get you going quickly without all the details.
Bareos comes prepackaged for a number of Linux distributions. Additional information can be found in the chapter Operating Systems.
On supported Linux distributions, the preferred way to install a single-host Bareos server is the bareos-setup tool. Download the standalone bareos-setup binary manually, copy it to the target host, and execute it as an administrator. The tool detects the platform, configures the Bareos repository, installs the required packages, prepares the local catalog where required, creates an initial WebUI administrator, enables the required services, and verifies that they are active.
For custom, distributed, non-standard, or non-Linux installations, use the manual installation instructions below as the second option.
Preferred option: install with bareos-setup
The bareos-setup tool is intended for installing a Bareos server on a supported Linux distribution. It is available as a web based wizard and as a terminal UI (TUI).
Web based installation
Run bareos-setup on the target Linux host:
root@host:~# ./bareos-setup
By default, the setup service listens only on the local loopback interface and opens a browser automatically. On headless systems, use --no-browser and open the printed URL manually:
root@host:~# ./bareos-setup --no-browser
Open this URL in your browser: http://127.0.0.1:19101/?token=...
The URL contains a setup token and should be treated as sensitive.
Accessing the wizard from another host
The setup service speaks plain HTTP, so it must not be exposed directly to an untrusted network. To run the wizard from your workstation, forward the setup port over SSH instead. This is the recommended way to install a remote server:
user@workstation:~$ ssh -L 19101:127.0.0.1:19101 root@server
Leave that session open, start the wizard in it, and open the printed http://127.0.0.1:19101/?token=... URL in your local browser:
root@server:~# ./bareos-setup --no-browser
All traffic is then encrypted and authenticated by SSH, and the setup service still listens only on the server’s loopback interface. Because the browser reaches the wizard through the tunnel, the connection is a local one from the server’s point of view, so the wizard also accepts Bareos Subscription credentials directly in the browser.
Alternatively, the setup service can be bound to a reachable interface:
root@host:~# ./bareos-setup --listen 0.0.0.0 --no-browser
Use this only on a trusted network. The setup wizard executes privileged commands as root or through sudo, the setup token in the URL is the only access control, and the connection is not encrypted. For that reason the wizard does not accept Bareos Subscription credentials in the browser over such a connection; it asks for them on the terminal it is running on instead. Prefer the SSH tunnel above.
The web wizard guides you through these steps:
Detect the Linux distribution and package manager.
Choose the Bareos Community or Bareos Subscription repository.
Install the required Bareos, PostgreSQL, and WebUI packages.
Prepare the catalog where required.
Create an initial WebUI administrator account.
Enable the WebUI proxy and web server.
Verify that the required services are active.
When the installation is complete, the wizard shows the WebUI URLs, the initial WebUI administrator credentials, and next steps. You can also manage the Bareos system locally with bconsole.
TUI installation
If no browser is available, run the same setup flow in terminal UI mode:
root@host:~# ./bareos-setup --tui
The TUI asks whether to use the Bareos Community or Bareos Subscription repository. When using the subscription repository, enter your subscription credentials when prompted. The credentials are passed to curl through standard input configuration and are not placed on the command line.
At the end of a successful TUI installation, the generated WebUI administrator password is printed in the terminal. Store it safely.
Unattended installation (Jenkins)
Use --unattended to install a complete Linux server without starting a
browser, HTTP listener, or terminal prompts:
root@host:~# ./bareos-setup --unattended
Without a repository override, setup selects the Community repository for the
detected distribution and executes its repository helper unchanged, using the
helper’s embedded URL assignment. Unsupported distributions require an
explicit override instead of an interactive repository selection.
For a CI staging repository, pass an explicit override:
root@host:~# ./bareos-setup --unattended \
    --override-repo-url https://ci.example/packages/build/Debian_12
The override URL must include the distribution directory containing
add_bareos_repositories.sh. The downloaded helper’s URL assignment is
replaced with the supplied URL, so packages are installed from the CI build
instead of the public repository. Only use trusted repositories: their helpers
are executed as root. Repository URLs must use HTTPS, and redirects to other
protocols are rejected. Credentials in URLs, query parameters, and multiple
repositories are not supported. With an explicit override, helpers without a
URL assignment fail explicitly. Without an override, no URL assignment
is required or rewritten.
This mode uses the same installation steps as the TUI: package installation,
local PostgreSQL and catalog initialization, base configuration, service
enablement/startup, and active-service checks. It requires a fresh server and
does not upgrade an existing installation or overwrite setup-owned configuration.
An existing local PostgreSQL cluster is reused. Where postgresql-setup
is required, the installer checks the service’s PGDATA directory and
initializes it only if it is missing or empty. A nonempty directory without
a nonempty PG_VERSION file is rejected without removing existing data.
The generated WebUI administrator password is not printed in CI logs; it is
stored in /etc/bareos/bareos-dir.d/console/admin.conf.
Use --extra-package PACKAGE for additional test packages,
--without-webui for a server without the WebUI, and --dry to preview
commands without changing the host.
Terminal and unattended modes display Boris the wizard once at startup,
including dry runs and redirected output. The banner uses UTF-8 line art when
the first nonempty locale setting among LC_ALL, LC_CTYPE, and LANG
specifies UTF-8; otherwise it uses plain ASCII. A terminal font with the
appropriate glyphs is needed to display the UTF-8 version correctly.
Browser mode, --help, and --version do not display the terminal artwork.
Tape support and additional repositories
Tape support is enabled by default. Use --without-tape-support to omit
bareos-storage-tape while retaining disk storage and the rest of the server.
This does not remove tape packages already installed. Requesting that package
explicitly with --extra-package conflicts with the opt-out.
The terminal wizard offers a tape-support prompt; the web wizard has a
corresponding checkbox.
Enabling tape does not authorize adding third-party or vendor repositories.
Use --allow-tape-repositories (or the separate terminal/web permission) to
allow approved vendor repositories when dependencies are missing. This option
cannot be combined with --without-tape-support. No repositories are enabled
when the required packages are already installed or available.
Automatic repository activation is currently limited to:
RHEL 9 and 10 on x86_64/aarch64: enable the official BaseOS and AppStream repositories through
subscription-manager. A valid entitlement is required. Dependency queries require the package manager’srepoquerysupport, provided bydnf-plugins-corewhen it is not already available.Registered SLES/SLED 15.6 and 15.7 on x86_64/aarch64: enable
PackageHub/<version>/<architecture>usingSUSEConnect.
The installer refreshes metadata and checks dependencies again after activation.
Registration, metadata, signing, or repository-activation errors stop installation.
Other platforms require manually configured repositories when dependencies
are unavailable; the installer does not mix packages from unrelated distributions.
Without repository consent, the existing SUSE missing-mtx warning and
tape-omission behavior is retained.
Unregistered Red Hat UBI repositories may omit mt-st and mtx.
Adding EPEL alone is not a solution for these dependencies. Use
--without-tape-support on such systems, or configure an entitled RHEL
environment. Repository consent does not register or purchase an entitlement.
Unsupported distributions
Bareos publishes repositories for a fixed set of distributions. If
bareos-setup cannot identify or automatically support the running
distribution, for example on a derivative, a rebuild, or openSUSE Tumbleweed,
it does not abort. Instead it offers a manual choice of the repository to
install from, in both the web wizard and the TUI. A distribution that declares
a compatible family through ID_LIKE in /etc/os-release is used to
preselect a matching suggestion.
The following repositories can be selected:
Distribution family |
Repositories |
|---|---|
RHEL and rebuilds |
|
Debian |
|
Ubuntu |
|
Fedora |
|
SUSE |
|
The selected repository is checked for availability before it is added, so a wrong choice fails immediately instead of part-way through the installation.
Warning
Installing a Bareos repository that was built for a different distribution is neither tested nor supported. Only do this if you know that the selected repository is binary compatible with the running system.
A manual choice is offered when the distribution is not automatically supported. It is not possible to override the repository on a distribution that bareos-setup supports automatically, because that could only produce a mismatched installation.
The package manager cannot be chosen manually. If none of apt, dnf, yum or zypper is present, bareos-setup cannot install Bareos on that system and reports this instead of continuing.
Second option: manual installation
Manual installation remains useful for non-Linux systems, distributed installations, and deployments that need custom package selection or custom database handling.
If Bareos is available as a package, the manual installation requires these steps to get to a running Bareos system:
This will start a very basic Bareos installation which will regularly backup a directory to disk. In order to fit it to your needs, you’ll have to adapt the configuration and might want to backup other clients.
Decide about the Bareos release to use
There are different types of Bareos repositories:
Bareos Subscription repositories on https://download.bareos.com/
Contain the repositories for the Bareos Subscription customers.
The last three major releases are maintained, https://download.bareos.com/bareos/release/
Older versions stay available.
While the repository can be browsed, using them do require authentication credentials, which come with a Bareos subscription.
Note
Interested in the subscription repositories? Start with a Bareos Evaluation Subscription at https://www.bareos.com/try/ .
Bareos Community repositories on https://download.bareos.org/ with
latest build of the most recent Bareos stable branch at https://download.bareos.org/current/
latest build of the Bareos master branch at https://download.bareos.org/next/
For details, see Bareos Binary Release Policy.
The public key to verify a repository is also in repository directory (Release.key for Debian based distributions, repodata/repomd.xml.key for RPM based distributions).
The following code snippets are shell scripts that can be used as orientation how to download the package repositories and install Bareos packages. The release version number for bareos and the corresponding Linux distribution have to be updated for your needs, respectively.
To simplify the installation, all Linux and FreeBSD repositories on https://download.bareos.org/ and https://download.bareos.com/ contain a script named add_bareos_repositories.sh.
Download the add_bareos_repositories.sh script
matching the requested Bareos release
and the distribution of the target system.
Copy the script onto the target system and
execute it with a shell (sh) as root (e.g. using sudo)
or manually perform the steps that are documented in the script.
For example the script URL Debian 13 of the community current repository is:
For Bareos Subscription customers the URL of the bareos-25 release for Debian 13 is:
Note
Bareos Subscription customers have credentials to authenticate against https://download.bareos.com.
Some files can be accessed without authentication, but to use the repositories,
authentication is mandatory. When downloading the file add_bareos_repositories.sh,
it is ready to use, because it contains your personal authentication credentials.
Therefore downloading this file requires authentication.
If this is inconvenient, you can alternatively download add_bareos_repository_template.sh
and set BAREOS_USERNAME and BAREOS_PASSWORD manually.
Install the Bareos Software Packages
The Bareos Director requires a PostgreSQL database as its catalog. The Bareos database packages have their dependencies only to the database client packages, therefore the database itself must be installed manually.
Important
Install and start a PostgreSQL database server.
The package bareos is only a meta package which contains dependencies on the main components of Bareos, see Bareos Packages. If you want to setup a distributed environment (like one Bareos Director, separate database server, multiple Bareos Storage Daemons) you have to choose the regarding Bareos packages to install on each of the hosts instead of just installing the bareos package.
Install on RedHat based Linux Distributions
RHEL and derivatives, Fedora
The RHEL_* repository is for Red Hat Enterprise Linux, the EL_* repositories are for RHEL derivatives, like AlmaLinux, CentOS Stream, Oracle and Rocky Linux. These repositories are automatically tested against several of this distributions.
Download the matching add_bareos_repositories.sh script from
https://download.bareos.com/bareos/release/,
https://download.bareos.org/current/ or https://download.bareos.org/next/,
copy it to the target system and execute it:
root@host:~# sh ./add_bareos_repositories.sh
root@host:~# yum install bareos
If authentication credentials are required (https://download.bareos.com)
they are stored within the repo file /etc/yum.repos.d/bareos.repo.
Install on SUSE based Linux Distributions
SUSE Linux Enterprise Server (SLES), openSUSE
Download the matching add_bareos_repositories.sh script from
https://download.bareos.com/bareos/release/,
https://download.bareos.org/current/ or https://download.bareos.org/next/,
copy it to the target system and execute it:
root@host:~# sh ./add_bareos_repositories.sh
root@host:~# zypper install bareos
If authentication credentials are required (https://download.bareos.com)
they are stored in the file /etc/zypp/credentials.d/bareos.
Install on Debian based Linux Distributions
Debian / Ubuntu / Univention Corporate Server (UCS)
Download the matching add_bareos_repositories.sh script from
https://download.bareos.com/bareos/release/,
https://download.bareos.org/current/ or https://download.bareos.org/next/,
copy it to the target system and execute it:
root@host:~# sh ./add_bareos_repositories.sh
root@host:~# apt update
root@host:~# apt install bareos
The add_bareos_repositories.sh script will:
Create a Bareos signature key file
/etc/apt/keyrings/bareos-*.gpg.Create the Bareos repository configuration file
/etc/apt/sources.list.d/bareos.sourcesThis file refers to the Bareos repository on the download server and to the local
/etc/apt/keyrings/bareos-*.gpgfile.
If authentication credentials are required (https://download.bareos.com) they are stored in the file
/etc/apt/auth.conf.d/download_bareos_com.conf.
Univention Corporate Server
The Univention Corporate Server (UCS) is an enterprise Linux distribution based on Debian.
Earlier releases (Bareos < 21, UCS < 5.0) offered extended integration into UCS and provided its software also via the Univention App Center. With version 5.0 of the UCS App Center the method of integration changed requiring commercially not reasonable efforts for deep integration.
Bareos continues to support UCS with the same functionality as the other Linux distributions.
During the build process, Bareos Debian 10 packages are automatically tested on an UCS 5.0 system. Only packages that passes this acceptance test, will get released by the Bareos project.
Note
While Bareos offers a software repository for UCS >= 5, this repository is identical with the corresponding Debian repository. The included APT sources file will also refer to the Debian repository.
Install on FreeBSD based Distributions
Download the matching add_bareos_repositories.sh script from
https://download.bareos.com/bareos/release/,
https://download.bareos.org/current/ or https://download.bareos.org/next/,
copy it to the target system and execute it:
root@host:~# sh ./add_bareos_repositories.sh

## install Bareos packages
root@host:~# pkg install --yes bareos.com-director bareos.com-storage bareos.com-filedaemon bareos.com-database-postgresql bareos.com-bconsole
The add_bareos_repositories.sh script will:
Create the Bareos repository configuration file
/usr/local/etc/pkg/repos/bareos.conf.If authentication credentials are required (https://download.bareos.com) they are stored inside the Bareos repository configuration file.
Prepare Bareos database
We assume that you already have your PostgreSQL database server installed and basically running.
For details, see chapter Catalog Maintenance.
Debian based Linux Distributions
Since Bareos Version >= 14.2.0 the Debian (and Ubuntu) based packages support the dbconfig-common mechanism to create and update the Bareos database.
Follow the instructions during install to configure it according to your needs.
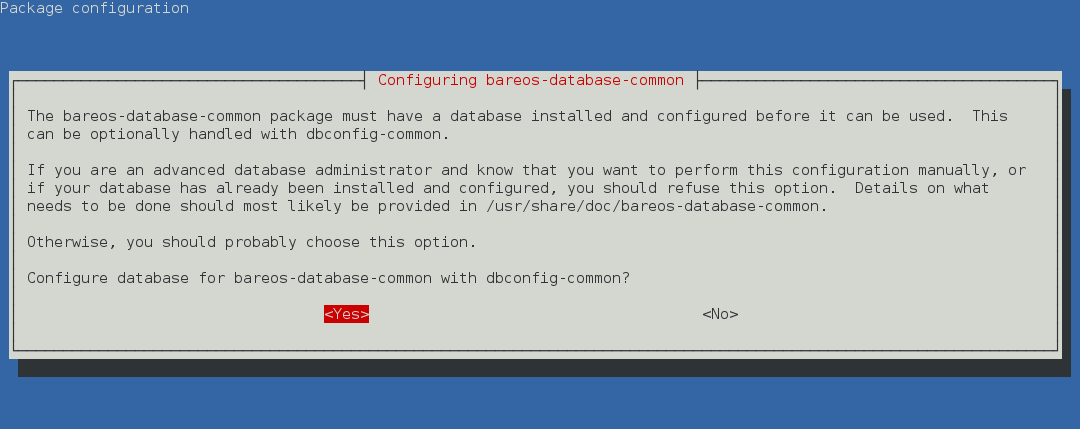
If you decide not to use dbconfig-common (selecting <No> on the initial dialog), follow the instructions for Other Platforms.
For details see dbconfig-common (Debian).
Other Platforms
If your PostgreSQL administration user is postgres (default), use the following commands:
Linux
su postgres -c /usr/lib/bareos/scripts/create_bareos_database
su postgres -c /usr/lib/bareos/scripts/make_bareos_tables
su postgres -c /usr/lib/bareos/scripts/grant_bareos_privileges
FreeBSD
su postgres -c /usr/local/lib/bareos/scripts/create_bareos_database
su postgres -c /usr/local/lib/bareos/scripts/make_bareos_tables
su postgres -c /usr/local/lib/bareos/scripts/grant_bareos_privileges
Start the daemons
Please remark, the Bareos Daemons need to have access to the TCP ports 9101-9103.
Linux
Depending on the Linux distribution, the name of the Bareos services either correspond to the package names (Debian and derivatives) or to the binary names (e.g. RPM based distributions).
To enable and start the daemon, either use
root@host:~# systemctl enable --now bareos-director.service
root@host:~# systemctl enable --now bareos-storage.service
root@host:~# systemctl enable --now bareos-filedaemon.service
or
root@host:~# systemctl enable --now bareos-dir.service
root@host:~# systemctl enable --now bareos-sd.service
root@host:~# systemctl enable --now bareos-fd.service
FreeBSD
## enable services
root@host:~# sysrc bareosdir_enable=YES
root@host:~# sysrc bareossd_enable=YES
root@host:~# sysrc bareosfd_enable=YES

## start services
root@host:~# service bareos-dir start
root@host:~# service bareos-sd start
root@host:~# service bareos-fd start
Now you should be able to log in to the Bareos Director using the Bareos Console.
When you want to use the Bareos WebUI, please refer to the chapter Installation.